User:Sakaki/Sakaki's EFI Install Guide/Configuring Secure Boot
In this section, which has no equivalent in the standard Gentoo handbook, we'll be setting up secure boot on your target machine.
While secure boot has received mixed reviews from the Linux community, it is a useful facility. With it activated, your machine will refuse to boot an executable that has been changed since it was signed (in an 'evil maid attack' for example), thereby closing off an important attack vector.
Windows 10 (and 8)-certified hardware ships with secure boot turned on by default (but only the Windows-sanctioned public keys installed in the machine), which is why, to get things started, we had to turn this feature off in the BIOS earlier in the tutorial. Now, however, we're going to 'take control of the platform' and add our own keys, so that we can use self-signed EFI stub kernels (which our buildkernel utility can create). The original Microsoft keys will be retained as well, so both Windows and our self-signed Gentoo kernels should be able to boot with secure mode on.
Of course, by retaining the Microsoft keys, your kernel binary could technically still be compromised in such an attack by someone with access to the Windows private keys (since they could resign it after making changes). If this bothers you, you can always remove the Windows keys from the machine completely, and fall back to non-secure-boot for Windows operation.
The steps we'll be undertaking are as follows (see below for a brief explanation of the terms used):
- We'll begin by saving off the current contents of the PK, KEK, db and dbx variables, as all four will be cleared when we enter setup mode (in step 4).
- We will then create three new private / public keypairs, to be used respectively as:
- our platform key (this will ultimately be stored in the PK signature database);
- our key exchange key (this will ultimately be appended to the KEK signature database); and
- our kernel-signing key (this will ultimately be appended to the db signature database).
- We'll then transform these keys into various formats for subsequent upload.
- We will then reboot the machine, and en route use the BIOS GUI to clear the secure variables, thereby entering setup mode.
- Then, we'll re-install our saved values of KEK, db and dbx together with our new public keys, using one of the following three keystore update methods (because of variations in BIOS function, you'll need to see which works on your machine):
- The default approach will be to use the efi-updatevar utility to install compound (old+new) signature lists from the command line. A fallback approach, where the original keys are first re-uploaded, and then the new keys appended, is also described. In both cases, the process is completed by setting our own key in PK, thereby re-entering user mode. We'll use the signed signature list for this.
- An second, alternative approach is to use your UEFI BIOS GUI to insert the new keys (if it supports this operation, as some do). This approach is briefly described (with example screenshots from a Dell Inspiron 5567 15 laptop's BIOS).
- A third, alternative approach is to use the KeyTool EFI utility to insert the keys. Again, this approach will be briefly described, with screenshots.
- With our keys inserted into the machine's keystore, we will then run buildkernel, to rebuild our EFI-stub kernel, this time appropriately signed with our new kernel-signing (private) key.
- Then we will restart the machine, enable secure boot, and check that our signed kernel is permitted to start up by the BIOS (it should be).
- We'll then reboot into Windows, and check that it is also still permitted to start (again, it should be). When in Windows, we'll take the chance to set the clock format to UTC.
- Finally, we'll reboot back into our signed kernel, (optionally setting a BIOS password en route) and proceed with the tutorial.
If you are building your target 'PC' as a VirtualBox guest, please be advised that, although VirtualBox does support EFI booting (through the "Enable EFI (special OSes only)" switch on the System/Motherboard configuration tab), it does not currently support emulation of secure boot. If building on VirtualBox rather than a 'real' PC therefore, you can (and should) safely skip the setup of the secure boot feature.
Users who do not wish to set up secure boot should click here to skip directly to the next relevant section instead ("Verifying Secure Boot with Windows (and Fixing RTC)"). In such a case, ensure secure boot is turned off when using Gentoo.
This chapter is only for those users who decided earlier to target systemd init, rather than OpenRC. It is part of the 'alternative track' set of chapters. If you are here by mistake, click here to go to the default (OpenRC) version of this page.
Let's get started!
Introduction
We'll begin with a (very brief) primer on secure boot. (For a more in-depth review, please refer to James Bottomley's article "The Meaning of all the UEFI Keys"[1], Greg Kroah-Hartman's article "Booting a Self-signed Linux Kernel"[2], Rod Smith's article "Managing EFI Boot Loaders for Linux: Dealing with Secure Boot" ff.[3] and of course the UEFI specification itself[4].)
If you're already familiar with secure boot, simply click here to skip directly to the next section.
A brief "meta-primer" on digital signatures may be in order first, since they are central to the operation of secure boot.
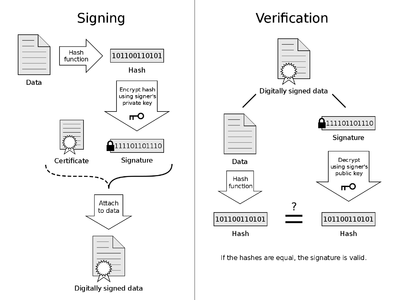
To sign a file (for example, an executable EFI-stub kernel), a message digest of that file is first created (a message digest is a cryptographic hash function, which creates a fixed-length summary value from input data of arbitrary size, in a manner that is practically impossible to invert).
Next, this digest is asymmetrically encrypted using a private key known only to the certifier. The resulting ciphertext is a digital signature, which may be appended to the original data to produce a digitally signed file.
To verify the signature, a recipient (or an automated system, such as the UEFI BIOS) splits the target file into the main body and digital signature, produces a digest of the first and compares it with the plaintext produced by decrypting (using a counterpart public key) the second. If the hashes match, the signature is valid (and the recipient can be confident that the payload was not tampered with).
The diagram below illustrates this process:
The UEFI specification defines four secure, non-volatile variables, which are used to control the secure boot subsystem. They are:
- The Platform Key (PK). The PK variable contains a UEFI (small 's', small 'd') 'signature database' which has at most one entry in it. When PK is emptied (which the user can perform via a BIOS GUI action), the system enters setup mode (and secure boot is turned off). In setup mode, any of the four special variables can be updated without authentication checks. However, immediately a valid platform key is written into PK (in practice, this would be an X.509 public key, using a 2048-bit RSA scheme), the system (aka, 'platform') enters user mode. Once in user mode, updates to any of the four variables must be digitally signed with an acceptable key.
The private key counterpart to the public key stored in PK may be used to sign user-mode updates to PK or KEK, but not db or dbx (nor can it be used to sign executables). - The Key Exchange Key (KEK). This variable holds a signature database containing one (or more) X.509 / 2048-bit RSA public keys (other formats are possible). In user mode, any db/dbx (see below) updates must be signed by the private key counterpart of one of these keys (the PK cannot be used for this).
While KEK keys (or, more accurately, their private-key counterparts) may also be used to sign executables, it is uncommon to do so, since that's really what db is for (see below). - The (caps 'S', caps 'D') Signature Database (db). As the name suggests, this variable holds a UEFI signature database which may contain (any mixture of) public keys, signatures and plain hashes. In practice, X.509 / RSA-2048 public keys are most common. It functions essentially as a boot executable whitelist (described in more detail shortly).
- The Forbidden Signatures Database (dbx). This variable holds a signature database of similar format to db. It functions essentially as a boot executable blacklist.
Now, here's the key point (excuse the pun): when the system is in user mode, and secure boot is enabled, the machine will only boot EFI executables which:
- are unsigned, but have a hash (message digest) in db and not in dbx; or
- are signed, where that signature appears in db but not in dbx; or
- are signed, where that signature is verifiable by a public key in db, or a public key in KEK, and where neither that key, not the signature itself, appears in dbx.
PK is not consulted when attempting to verify executables.
When you buy a new Windows (10 or 8) machine, it will usually be set up as follows:
- The PK variable will be loaded with a public key issued by the hardware vendor (for example, Panasonic).
- The KEK variable will be loaded with a public key issued by Microsoft.
- The db variable will be loaded with a set of public keys issued by various vendors authorized by Microsoft).
- The dbx variable will generally contain some revoked signatures or hashes (although it may also be empty, it depends on the revision of Windows on your machine).
Saving Current Keystore Values, and Creating New Keys
We begin by re-establishing an ssh connection, as before (as it will make the work of entering commands etc. easier). From the helper PC, issue:
user@pc2 $ssh root@192.168.1.106
Password: <enter root password>
... additional output suppressed ...
Substitute whatever IP address you got back from ifconfig earlier for
192.168.1.106 in the above command. It is possible (although unlikely, with modern DHCP) that the target's IP address will have changed during the reboot for plymouth testing. If so, log in directly at the target machine's keyboard, use ifconfig to find out the new address, then issue the above ssh command citing that address. As before, in such a case you may need to clean out any previous record of ssh connections to (other machines at) that new address (since the fingerprints will not match), using:
user@pc2 $sed -i '/^[^[:digit:]]*192.168.1.106[^[:digit:]]/d' ~/.ssh/known_hosts
192.168.1.106 in the above. Then, be sure to check the fingerprint when prompted (by the subsequent ssh command), against those you noted down earlier.If installing over WiFi, and you had to manually restart wpa_supplicant in the previous chapter, then you'll need to do so again here (directly at the target machine's keyboard) before you'll be able to ssh in.
Now proceed as below, using the ssh connection to enter all commands unless otherwise specified (incidentally, there is no need to use screen at this point, since we'll be rebooting again shortly). Issue:
koneko ~ #mkdir -p -v /etc/efikeys
The buildkernel script expects to find its keys in the /etc/efikeys directory, so please don't change the location.
Ensure only the superuser can access this directory, using chmod - issue:
koneko ~ #chmod -v 700 /etc/efikeys
koneko ~ #cd /etc/efikeys
Next, we'll use the efi-readvar tool (from the app-crypt/efitools) to store off the current values of PK, KEK, db and dbx, in machine-readable signature list format. Issue:
koneko /etc/efikeys #efi-readvar -v PK -o old_PK.esl
koneko /etc/efikeys #efi-readvar -v KEK -o old_KEK.esl
koneko /etc/efikeys #efi-readvar -v db -o old_db.esl
koneko /etc/efikeys #efi-readvar -v dbx -o old_dbx.esl
If you omit the
-o option, the variables will be dumped as text, and you won't be able to reload them, so take care!If you have problems with the efi-readvar command, make sure that you have symbolically linked /etc/mtab to /proc/self/mounts, as described earlier in the tutorial, because efi-readvar has a problem similar to that described in bug #434090. If you haven't got this symbolic link in place, you should do it now, restart, reconnect ssh, and then rejoin the tutorial from this point, trying the above commands again.
Now we can create a new platform keypair, key-exchange keypair and kernel-signing keypair. We'll use openssl to do this. The requested keys will:
- use X.509 certificate format for the public key (this allows various additional data fields to be passed with the key if desired, for subsequent identification);
- utilise the RSA asymmetric cryptosystem, with a 2048 bit key length;
- have 10 years (3650 days) to run until expiry;
- use SHA-256 as the public key's message digest.
Issue:
koneko /etc/efikeys #openssl req -new -x509 -newkey rsa:2048 -subj "/CN=sakaki's platform key/" -keyout PK.key -out PK.crt -days 3650 -nodes -sha256
koneko /etc/efikeys #openssl req -new -x509 -newkey rsa:2048 -subj "/CN=sakaki's key-exchange-key/" -keyout KEK.key -out KEK.crt -days 3650 -nodes -sha256
koneko /etc/efikeys #openssl req -new -x509 -newkey rsa:2048 -subj "/CN=sakaki's kernel-signing key/" -keyout db.key -out db.crt -days 3650 -nodes -sha256
You can substitute anything you like for the "common name" (CN) text in the above commands (and you should in any event change the name from
sakaki! ^-^ ). Alternatively, if you omit the -subj "/CN=<...>/" text completely, you will be prompted to enter values, in exactly the same manner as when creating a self-signed domain certificate.[5] None of the information fields (CN, C etc.) affect the operation of secure boot. However, putting some meaningful text in there can help when later reviewing the contents of the four secure variables (which you can do by simply issuing efi-readvar, with no arguments).It is possible of course to specify
rsa:4096 in the above commands, for better security. However, not all BIOSes will accept 4096-bit keys; 2048-bit keys (as in the above) are the lowest common denominator at the time of writing. As such, my advice would be to run through the process in this chapter with 2048-bit keys initially; then, once you have everything working (and only if you wish so to do — it is entirely optional), you can repeat the process, but with 4096-bit keys.This will have created three X.509 public-key certificate files (PK.crt, KEK.crt and db.crt), and three counterpart private key files (PK.key, KEK.key and db.key). We'll make the private keys readable only by root (an extra precaution, since they already in a directory readable only by root). Issue:
koneko /etc/efikeys #chmod -v 400 *.key
Preparing Keystore Update Files from Keys
Now we have the old keys archived, and our new keys produced, we will create a variety of files that may be used to update the keystore. There is a degree of redundancy in what follows, but creating the variants does not take long, and will provide you with maximum flexibility in the next step (different BIOSes have different requirements for keystore update files, so it is impossible to be prescriptive).
We'll begin by creating a 'signed signature list' (aka '.auth') format version of the PK variable, as efi-updatevar (and even many BIOS GUIs that afford the option) will only accept it in this format. We can create this in a two step process (using two command line tools from app-crypt/efitools). First, we make a signature list (which requires a unique ID, the value of which is essentially unimportant), and then we use our own (private) platform key to sign it. Let's do both now - issue:
koneko /etc/efikeys #cert-to-efi-sig-list -g "$(uuidgen)" PK.crt PK.esl
koneko /etc/efikeys #sign-efi-sig-list -k PK.key -c PK.crt PK PK.esl PK.auth
The file we need out of this is PK.auth.
Next, since with some machine BIOSes it can be useful to generate a .auth file for your custom KEK as well, issue:
koneko /etc/efikeys #cert-to-efi-sig-list -g "$(uuidgen)" KEK.crt KEK.esl
koneko /etc/efikeys #sign-efi-sig-list -a -k PK.key -c PK.crt KEK KEK.esl KEK.auth
(Notice that the PK private key was used to sign, in this case, and that we used the -a option, to indicate that this is to be used to append data, rather than replace it.) The file we need out of this is KEK.auth.
We'll do the same for your custom db as well, issue:
koneko /etc/efikeys #cert-to-efi-sig-list -g "$(uuidgen)" db.crt db.esl
koneko /etc/efikeys #sign-efi-sig-list -a -k KEK.key -c KEK.crt db db.esl db.auth
(Notice that the KEK private key was used to sign, in this case, and again, -a was specified.) The file we need out of this is db.auth.
When using the KeyTool EFI utility (keystore update method 3), some BIOSes will only allow you to append to the db and KEK variable in this format.
Lastly, we'll do the same for the saved dbx:
koneko /etc/efikeys #sign-efi-sig-list -k KEK.key -c KEK.crt dbx old_dbx.esl old_dbx.auth
(Notice that the KEK private key was again used to sign, but that -a was not specified.) The file we need out of this is old_dbx.auth.
Next, we'll create DER versions of each of our three new public keys, as follows:
koneko /etc/efikeys #openssl x509 -outform DER -in PK.crt -out PK.cer
koneko /etc/efikeys #openssl x509 -outform DER -in KEK.crt -out KEK.cer
koneko /etc/efikeys #openssl x509 -outform DER -in db.crt -out db.cer
When updating your keystore using the BIOS GUI (keystore update method 2), some BIOSes will only allow you to append keys in DER format, as just created.
Finally, we'll create compound (i.e., old+new) esl files for the KEK and db (esl files can simply be concatenated[6]), and also create .auth counterparts for these. Issue:
koneko /etc/efikeys #cat old_KEK.esl KEK.esl > compound_KEK.esl
koneko /etc/efikeys #cat old_db.esl db.esl > compound_db.esl
koneko /etc/efikeys #sign-efi-sig-list -k PK.key -c PK.crt KEK compound_KEK.esl compound_KEK.auth
koneko /etc/efikeys #sign-efi-sig-list -k KEK.key -c KEK.crt db compound_db.esl compound_db.auth
On some machines (with certain AMT, and some other, BIOSes) efi-updatevar 'append' commands may fail, with an error of
Cannot write to ..., wrong filesystem permissions, even though an initial 'insert' command is allowed. This appears to be a known issue,[7] but there is no fix in efi-updatevar as yet. As such, in our keystore update method 1, we'll by default use these compound esl files to finesse the problem (as with them, only one 'insert' per variable will be required).This tutorial is primarily aimed at those users wishing to dual-boot, who will, therefore, wish to retain the Microsoft keys (without which, Windows will not secure boot). However, if you do not wish to retain the Microsoft keys, (other than their dbx, which is safe), then you should perform the following four commands, making your 'compound' KEK and db esl files identical to your new version, omitting the Microsoft components, and (re-)creating .auth counterparts for them:
koneko /etc/efikeys #cp -v KEK.esl compound_KEK.esl
koneko /etc/efikeys #cp -v db.esl compound_db.esl
koneko /etc/efikeys #sign-efi-sig-list -k PK.key -c PK.crt KEK compound_KEK.esl compound_KEK.auth
koneko /etc/efikeys #sign-efi-sig-list -k KEK.key -c KEK.crt db compound_db.esl compound_db.auth
That's it, we now have our keystore update files prepared. Next, we'll enter setup mode, after which we'll update the keystore, using one of three possible keystore update methods.
Entering Setup Mode (Clearing Keystore)
To enter setup mode (wherein your target PC's keystore is emptied, allowing unsigned updates to be made to it), first reboot the machine (leave the boot USB key inserted):
koneko /etc/efikeys #systemctl reboot
Immediately your target PC starts to come back up again, enter the BIOS setup screen. As mentioned before, the exact method of entering the BIOS varies greatly from machine to machine (as does the BIOS user interface itself). On the Panasonic CF-AX3, press F2 during startup (you may need to press it repeatedly, and you do this directly on the target machine's keyboard).
Once the BIOS setup screen comes up, using the same navigation techniques as before, perform the following steps:
- clear the UEFI secure boot variables, thereby entering setup mode; and
- restart your machine (saving changes).
It's impossible to be precise about the GUI actions required to achieve the above, as they will vary from BIOS to BIOS. However, to give you some idea, here's how you go about it on the Panasonic CF-AX3 (which has an AMT BIOS).
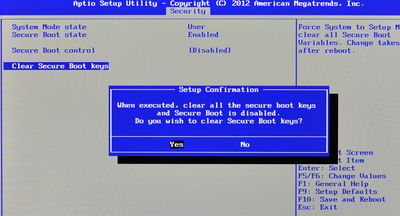
To achieve step 1, use the arrow keys to navigate across to the 'Security' tab. Then, navigate down to the 'Secure Boot' item, and press Enter. This enters a special 'Security' sub-page. Navigate down to the 'Clear Secure Boot Keys' item, and press Enter. Confirm that you wish to proceed by selecting 'Yes' in the popup which appears, then press Enter. If asked to reconfirm, select 'Yes' and press Enter again:
Note that on some UEFI implementations it is required to set a supervisor password in order for the option to clear the Secure Boot keys to be available.
Next, ensure that your boot USB key is still inserted, then press F10 to restart (step 2), and confirm if prompted.
The machine should restart, and, just as before, you will see the plymouth passphrase screen. Enter your LUKS keyfile gpg passphrase (the one you created earlier), directly at the target machine keyboard, and wait for the text console login to appear.
Installing New Keys into the Keystore
As mentioned briefly in the introduction, having cleared your PC's keystore, there are three main methods that may be used to update it with our new keys (in addition to the Microsoft keys, which, by default, we are retaining). You will need to experiment to see which of these methods works for you. Unfortunately, it is impossible to be prescriptive, as UEFI BIOSes vary greatly in what they will accept. For most systems, method 1 (immediately below) is the most likely to work (and it is certainly the most straightforward), so, we shall try that first, only falling back to methods 2 or 3 if necessary. Let's go!
Method 1: Inserting Keys using efi-updatevar
Begin by re-connecting to the machine via ssh. From the helper PC, issue:
user@pc2 $ssh root@192.168.1.106
Password: <enter root password>
... additional output suppressed ...
Substitute whatever IP address you got back from ifconfig earlier for
192.168.1.106 in the above command. It is possible (although unlikely, with modern DHCP) that the target's IP address will have changed during the reboot. If so, log in directly at the target machine's keyboard, use ifconfig to find out the new address, then issue the above ssh command citing that address. As before, in such a case you may need to clean out any previous record of ssh connections to (other machines at) that new address (since the fingerprints will not match), using:
user@pc2 $sed -i '/^[^[:digit:]]*192.168.1.106[^[:digit:]]/d' ~/.ssh/known_hosts
192.168.1.106 in the above. Then, be sure to check the fingerprint when prompted (by the subsequent ssh command), against those you noted down earlier.If installing over WiFi, and you had to manually restart wpa_supplicant in the previous chapter, then you'll need to do so again here (directly at the target machine's keyboard) before you'll be able to ssh in.
Now proceed as below, using the ssh connection to enter all commands unless otherwise specified (again, we will not need screen). Issue:
koneko ~ #cd /etc/efikeys
You can verify that the secure variables have been cleared. To do so, enter:
koneko /etc/efikeys #efi-readvar
Variable PK has no entries
Variable KEK has no entries
Variable db has no entries
Variable dbx has no entries
and check that the output is as shown above.
You may see a fifth variable, MokList, displayed when you do this. This is an EFI "Boot Services Only Variable" which some Linux distributions use to allow their bootloader shims to work under secure boot.[8] We won't need to worry about it.
Next, we'll reload the 'compound' (old+new) contents of the dbx, db and KEK, using the 'compound' signature list files we created earlier (although the dbx will just use the old file, as we have nothing to add to it). Issue:
koneko /etc/efikeys #efi-updatevar -e -f old_dbx.esl dbx
koneko /etc/efikeys #efi-updatevar -e -f compound_db.esl db
koneko /etc/efikeys #efi-updatevar -e -f compound_KEK.esl KEK
The -e option specifies that an EFI signature list file is to be loaded (and the -f option precedes the filename itself). Because we are in setup mode, no private key is required for these operations (which it would be, if we were in user mode).
We have nothing to add to the Microsoft exclusion list (dbx), so we just use their original esl in the above. This is safe, even if you are purging Windows from your machine, as it only limits known-bad software from running.
If you experience errors when running the preceding commands (the most likely being a message of Cannot write to ..., wrong filesystem permissions when running efi-updatevar), then method 1 is not usable on your BIOS, and you should jump now to method 2 and try that, instead.
Fallback method: for some BIOSes, even when the 'compound esl' approach does not work, it may still be possible to update from the command line using efi-updatevar, by adopting a slightly different strategy, viz.: starting with an empty keystore, first write only the old values back to KEK, db and dbx, and then append the new public keys as a second step.
To do this, first ensure you have a clean keystore, repeating the instructions given above, if necessary. Then (working in the /etc/efikeys directory as root), issue:
koneko /etc/efikeys #efi-updatevar -e -f old_dbx.esl dbx
koneko /etc/efikeys #efi-updatevar -e -f old_db.esl db
koneko /etc/efikeys #efi-updatevar -e -f old_KEK.esl KEK
To insert (only) the old values of dbx, db and KEK. The machine is still in user mode after this, as PK has not yet been written. Then, issue:
koneko /etc/efikeys #efi-updatevar -a -c db.crt db
koneko /etc/efikeys #efi-updatevar -a -c KEK.crt KEK
To append the new keys.
Note that here, we are using the -a option to append (rather than replace), and a slightly different format for the input file (since it is a X.509 certificate, rather than a signature list, we drop the -e, and use -c rather than -f to introduce the pathname). More details can be found in the efi-updatevar manpage.
If that works, continue reading immediately below; otherwise, the efi-updatevar (aka method 1) approach will not work on your machine, and you should jump now to method 2 and try that, instead.
For avoidance of doubt, if the original 'compound esl' approach (above) did work for you, you should not carry out the instructions detailed in this note - instead, simply continue reading immediately below.Having made our changes, we can now write our own platform key into PK, using the signed signature list we created earlier. Issue:
koneko /etc/efikeys #efi-updatevar -f PK.auth PK
If this succeeds, the target machine will have been switched back to user mode (although secure boot is not yet enabled).
Display the contents of all the secure variables now. Issue:
koneko /etc/efikeys #efi-readvar
and verify that both your new keys, and Microsoft's original set, are present.
Now, let's make a backup (in machine readable signature list format) of the current (i.e., new) state of the variables. Issue:
koneko /etc/efikeys #efi-readvar -v PK -o new_PK.esl
koneko /etc/efikeys #efi-readvar -v KEK -o new_KEK.esl
koneko /etc/efikeys #efi-readvar -v db -o new_db.esl
koneko /etc/efikeys #efi-readvar -v dbx -o new_dbx.esl
If all of the above went through without error, congratulations, your augmented keystore has now been set up, so continue reading at Testing Secure Boot with a Signed Kernel, below. Do not carry out the commands in method 2 or method 3; your setup is already complete.
However, if you did experience errors when running the preceding commands (the most likely being a message of Cannot write to ..., wrong filesystem permissions when running efi-updatevar above), you should continue reading and try method 2, immediately below.
Method 2: Inserting Keys via PC's BIOS GUI
You need only try the approach outlined here if method 1 did not work on your machine; if method 1 did work, continue reading from this point instead.
Some higher-end or developer-oriented PCs will allow direct manipulation of the keystore variables through the UEFI BIOS GUI. If yours does, you will very likely be able to load your key-material setup files (stored temporarily on the USB boot key, so that the EFI BIOS can read them) in this way instead.
Assuming you are currently logged in to your target PC as root and are working the /etc/efikeys directory, proceed as follows. First, ensure the boot USB key is still inserted into the target PC. Then, temporarily mount it; issue:
koneko /etc/efikeys #lsblk
to locate the drive, and then issue
koneko /etc/efikeys #mount -v -t vfat /dev/sdM1 /boot/efi
to mount it.
Replace /dev/sdM1 in the above command with that of your boot USB key's first partition, as determined via lsblk; this will be something like /dev/sdb1, /dev/sdc1 etc., but the actual path will be system-dependent.
Then, copy all the (non-private) key material onto this key (none of these files is very large). Issue:
koneko /etc/efikeys #cp -v *.{auth,cer,crt,esl} /boot/efi/
Don't copy any of the *.key files onto the USB drive! These are the private keys, and should not be publicly shared.
Now sync, and unmount the boot USB key again:
koneko /etc/efikeys #sync
koneko /etc/efikeys #umount -v /boot/efi
then, leaving the boot USB key inserted, reboot the machine:
koneko /etc/efikeys #systemctl reboot
Immediately your target PC starts to come back up again, enter the BIOS setup screen. As mentioned before, the exact method of entering the BIOS varies greatly from machine to machine (as does the BIOS user interface itself). On the Panasonic CF-AX3, you press F2 during startup (you may need to press it repeatedly, and you do this directly on the target machine's keyboard; as it happens the same BIOS entry method works for the Dell Inspiron 5567 15 laptop, which was used for the screenshots below).
Once the BIOS setup screen comes up, using the same navigation techniques as before, perform the following steps:
- clear the UEFI secure boot variables (again), thereby entering setup mode;
- use the BIOS GUI to load old_dbx.auth, compound_db.auth and compound_KEK.auth, in that order;
- use the BIOS GUI to load PK.auth, thereby setting the machine back into user mode; then
- restart your machine (saving changes).
It's impossible to be precise about the GUI actions required to achieve the above, as they will vary from BIOS to BIOS. However, to give you some idea, here's how you go about it on a Dell Inspiron 5567 15 laptop, which has a custom Dell BIOS.
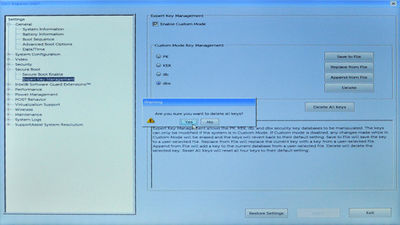
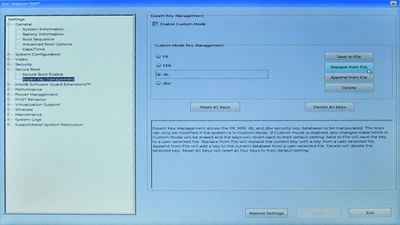
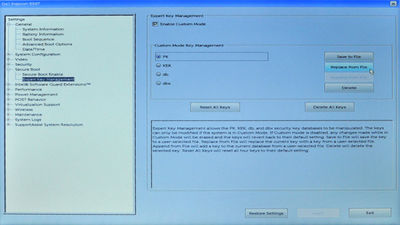
To achieve step 1, use the mouse or touchpad to expand the 'Secure Boot' treeview item in the left panel, and click on the 'Expert Key Management' sub-item. In the right pane, make sure the 'Enable Custom Mode' checkbox is ticked, then click the 'Delete All Keys' button (and click 'Yes' when prompted to confirm), to clear the keystore:
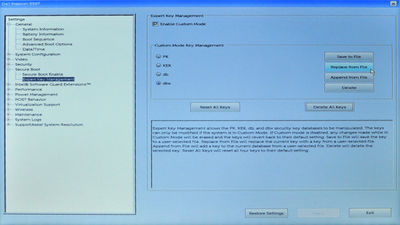
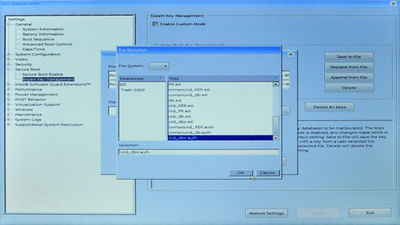
Then, to achieve step 2, first click on the 'dbx' radio button (in the 'Custom Mode Key Management' group), then click 'Replace from File'. A dialog box will open, allowing you to select which (EFI) filesystem you wish to read from. Select the line in the 'File System List' that contains 'USB' (it should be chosen by default; the other is the Windows EFI partition on your hard drive), and then click the button marked '...' to bring up a file chooser. Then, select the old_dbx.auth file (that we prepared and copied to the boot USB key earlier) from this list, and click 'OK' to select it, then 'OK' again to load it:
You may be wondering why we select the .auth rather than the .esl file here, since the machine has a clear keystore, and so has no KEK to check the signature on old_dbx.auth against. The reason is simply that the .auth file format seems to be accepted on more machines' BIOSes than .esl, although (for all but the final PK value), the .esl files should be just as useful.
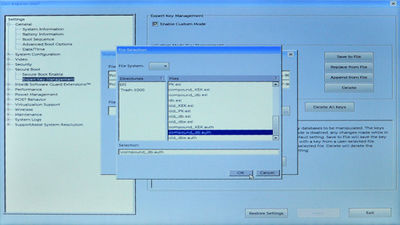
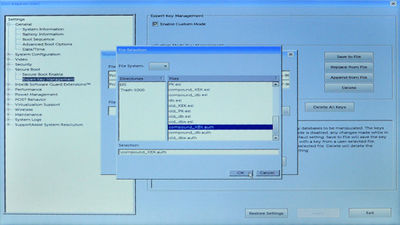
Next, do the same thing with the db variable, only this time, choose the compound_db.auth file (that we prepared and copied to the boot USB key earlier) in the file selection dialog:
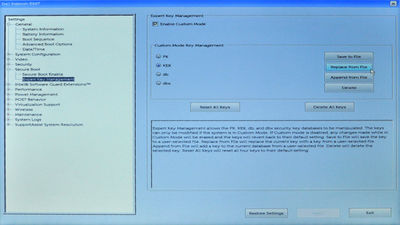
With the dbx and db loaded, next do the same for the KEK secure boot variable. Here, choose the compound_KEK.auth file (that we prepared and copied to the boot USB key earlier) in the file selection dialog:
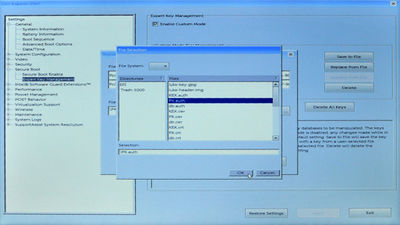
Lastly, we do the same thing for the PK secure boot variable, thereby tipping the system back into user mode (but with our platform key installed). Here, choose the PK.auth file (that we prepared and copied to the boot USB key earlier) in the file selection dialog:
With all four secure boot variables set up, simply click on the 'Exit' button to restart (thereby achieving step 4).
The machine should restart, and, just as before, you will see the plymouth passphrase screen. Enter your LUKS keyfile gpg passphrase (the one you created earlier), directly at the target machine keyboard, and wait for the text console login to appear.
Then, re-connect to the machine via ssh. From the helper PC, issue:
user@pc2 $ssh root@192.168.1.106
Password: <enter root password>
... additional output suppressed ...
Substitute whatever IP address you got back from ifconfig earlier for
192.168.1.106 in the above command. It is possible (although unlikely, with modern DHCP) that the target's IP address will have changed during the reboot. If so, log in directly at the target machine's keyboard, use ifconfig to find out the new address, then issue the above ssh command citing that address. As before, in such a case you may need to clean out any previous record of ssh connections to (other machines at) that new address (since the fingerprints will not match), using:
user@pc2 $sed -i '/^[^[:digit:]]*192.168.1.106[^[:digit:]]/d' ~/.ssh/known_hosts
192.168.1.106 in the above. Then, be sure to check the fingerprint when prompted (by the subsequent ssh command), against those you noted down earlier.If installing over WiFi, and you had to manually restart wpa_supplicant in the previous chapter, then you'll need to do so again here (directly at the target machine's keyboard) before you'll be able to ssh in.
Now proceed as below, using the ssh connection to enter all commands unless otherwise specified (again, we will not need screen). Issue:
koneko ~ #cd /etc/efikeys
Display the contents of all the secure variables now. Issue:
koneko /etc/efikeys #efi-readvar
and verify that both your new keys, and Microsoft's original set, are present.
Now, let's make a backup (in machine readable signature list format) of the current (i.e., new) state of the variables. Issue:
koneko /etc/efikeys #efi-readvar -v PK -o new_PK.esl
koneko /etc/efikeys #efi-readvar -v KEK -o new_KEK.esl
koneko /etc/efikeys #efi-readvar -v db -o new_db.esl
koneko /etc/efikeys #efi-readvar -v dbx -o new_dbx.esl
Obviously, in the preceding, the actual BIOS GUI operations you will need to perform will most likely be somewhat different (depending on the make and version of your UEFI BIOS), but, if you were able to insert the four .auth files without error (and the above efi-readvar shows the values correctly initialized), then congratulations, your augmented keystore has now been set up, so continue reading at Testing Secure Boot with a Signed Kernel, below. Do not carry out the commands in method 3; your setup is already complete.
However, if you did experience errors when running the preceding commands (for example, your PC's BIOS claims your .auth files have an unrecognised format), you should continue reading and try method 3, immediately below.
If your target PC's UEFI BIOS GUI appears to afford you the option of loading the secure-boot variables from file, but the above .auth-based flow did not work for you, it is worth experimenting with some of the other keystore setup file types (for example, vanilla .esl rather than .auth), or a different load order (for example, KEK→db→dbx→PK, rather than dbx→db→KEK→PK), or appending (rather than overwriting) the variable contents, before giving up and trying method 3. Unfortunately, as BIOSes vary greatly and are almost all closed-source, it is impossible to be any more definitive.
Method 3: Inserting Keys via Keytool
You need only try the approach outlined here if neither method 1 nor method 2 worked on your machine; if either method 1 or method 2 did work, continue reading from this point instead.
Even if your UEFI BIOS does not provide the ability to update the secure boot variables from file (or, if it appears to do so, but would not work for you when following method 2, above), you can still use the KeyTool binary (which is bundled with app-crypt/efitools) for this purpose. It is an EFI executable program.
To use it, we'll copy the executable onto the boot USB key, and install a one-time EFI boot entry for it. Then, we'll clear the secure-boot state using the BIOS GUI, allow the BIOS to restart into KeyTool, and then use this program to set our desired dbx, db, KEK and PK. Then, we'll reboot back into Gentoo again.
To do so, assuming you are currently logged in to your target PC as root and are working the /etc/efikeys directory, proceed as follows. First, ensure the boot USB key is still inserted into the target PC. Then, temporarily mount it; issue:
koneko /etc/efikeys #lsblk
to locate the drive, and then issue
koneko /etc/efikeys #mount -v -t vfat /dev/sdM1 /boot/efi
to mount it.
Replace /dev/sdM1 in the above command with that of your boot USB key's first partition, as determined via lsblk; this will be something like /dev/sdb1, /dev/sdc1 etc., but the actual path will be system-dependent.
Next, if you have not already done so as part of method 2, above, copy all the (non-private) key material onto this key (none of these files is very large). Issue:
koneko /etc/efikeys #cp -v *.{auth,cer,crt,esl} /boot/efi/
Don't copy any of the *.key files onto the USB drive! These are the private keys, and should not be publicly shared.
Next, copy the KeyTool executable to the boot USB key:
koneko /etc/efikeys #cp -v /usr/share/efitools/efi/KeyTool.efi /boot/efi/EFI/Boot/
At your option, you can instead sign the EfiTool executable with your db key, and use that version. (This is not required at the moment, since secure boot is off, but doing so will allow you to use the tool again in the future, even once secure boot has been enabled). To use a signed KeyTool, instead of the above command, issue:
koneko /etc/efikeys #sbsign --key db.key --cert db.crt --output /boot/efi/EFI/Boot/KeyTool.efi /usr/share/efitools/efi/KeyTool.efi
Now, we need to tell the UEFI BIOS to boot KeyTool on the next restart, but after that to revert to the normal boot order (so our Gentoo system will boot again). To do so, we'll archive the current boot order into a temporary shell variable OLD_BOOTORDER, create a new boot entry for KeyTool (at EFI boot slot 99, which should be unused; this entry will automatically go to the top of the boot list), reset the boot list to the value of OLD_BOOTORDER (thereby dropping bootslot 99 from the permanent boot order), then set the one-time BootNext entry to point to KeyTool's entry (slot 99). Issue:
koneko /etc/efikeys #OLD_BOOTORDER="$(efibootmgr | grep "^BootOrder: " | cut -d' ' -f2)"
koneko /etc/efikeys #efibootmgr --create --disk /dev/sdM --part 1 --loader /EFI/Boot/KeyTool.efi --label KeyTool --bootnum 99
koneko /etc/efikeys #efibootmgr --bootorder "${OLD_BOOTORDER}"
koneko /etc/efikeys #efibootmgr --bootnext 99
Replace /dev/sdM in the above command with that of your boot USB key's device path, as determined via lsblk; this will be something like /dev/sdb, /dev/sdc etc., but the actual path will be system-dependent. Note that here, you specify the drive itself, so e.g., /dev/sdb and not /dev/sdb1, /dev/sdc and not /dev/sdc1 etc.
Now sync, and unmount the boot USB key again:
koneko /etc/efikeys #sync
koneko /etc/efikeys #umount -v /boot/efi
then, leaving the boot USB key inserted, reboot the machine:
koneko /etc/efikeys #systemctl reboot
Immediately your target PC starts to come back up again, enter the BIOS setup screen. As mentioned before, the exact method of entering the BIOS varies greatly from machine to machine (as does the BIOS user interface itself). On the Panasonic CF-AX3, you press F2 during startup (you may need to press it repeatedly, and you do this directly on the target machine's keyboard; the same BIOS entry method works for the Dell Inspiron 5567 15 laptop, which we will continue with in the following example).
Once the BIOS setup screen comes up, using the same navigation techniques as before, perform the following steps:
- clear the UEFI secure boot variables (again), thereby entering setup mode; and
- restart your machine (saving changes).
It's impossible to be precise about the GUI actions required to achieve the above, as they will vary from BIOS to BIOS. However, to give you some idea, here's how you go about it on a Dell Inspiron 5567 15 laptop, which has a custom Dell BIOS.
To achieve step 1, use the mouse or touchpad to expand the 'Secure Boot' treeview item in the left panel, and click on the 'Expert Key Management' sub-item. In the right pane, then make sure the 'Enable Custom Mode' checkbox is ticked, then click the 'Delete All Keys' button (and click 'Yes' when prompted to confirm), to clear the keystore:
If your BIOS does not offer you the ability to at least clear the EFI secure boot variables (and thereby enter setup mode), you will not be able to use secure boot for Linux your machine, and you should skip to the next section now. In such a case, turn off secure boot when using Gentoo.
To restart, simply click on the 'Exit' button to restart (thereby achieving step 2).
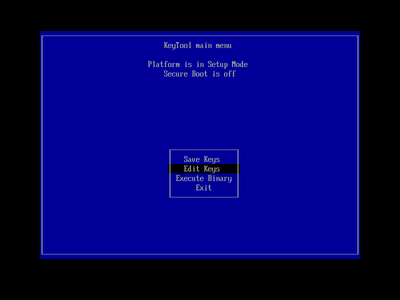
Because of our earlier change to the BootNext value, the machine should then restart directly into KeyTool. This will display its main menu screen, with an indication that the PC is in setup mode, and that secure boot is off. Working directly at the target machine's keyboard, use the arrow keys to highlight the 'Edit Keys' menu entry:
and press Enter to select it.
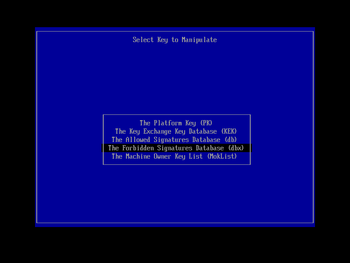
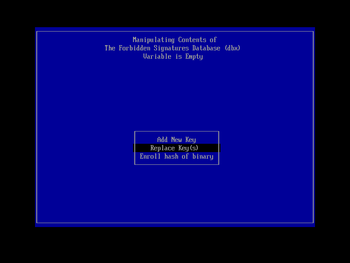
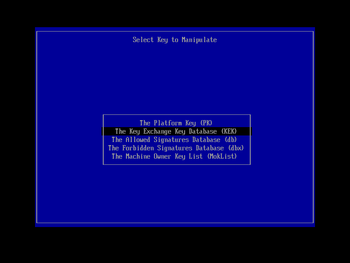
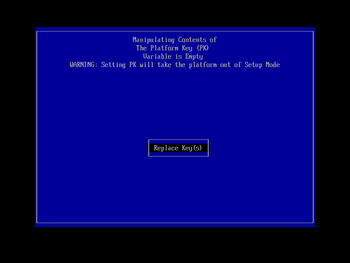
You will then be presented with a list of the secure boot keys that KeyTool can manipulate. Using the cursor keys, navigate down to 'The Forbidden Signatures Database (dbx)', and press Enter to select it. In the next menu screen (using the same navigation techniques; you can use the Esc key to back out a level if you make a mistake) choose the 'Replace Key(s)' entry and press Enter. You will then be prompted to select a filesystem; choose the one shown that contains 'Usb' (the other is your Windows EFI partition on the machine's hard drive, probably labelled 'ESP') and press Enter. In the subsequent file chooser list, select old_dbx.auth (that we prepared and copied to the boot USB key earlier) and press Enter to load it:
The order that files are displayed in the chooser may differ on your system.
You may be wondering why we select the .auth rather than the .esl file here, since the machine has a clear keystore, and so has no KEK to check the signature on old_dbx.auth against. The reason is simply that the .auth file format seems to be accepted on more machines' BIOSes than .esl, although (for all but the final PK value), the .esl files should be just as useful.
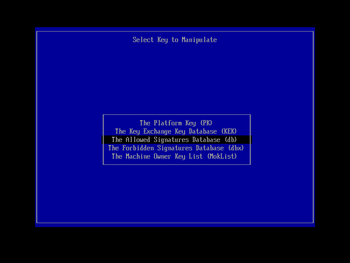
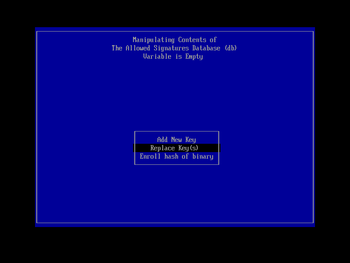
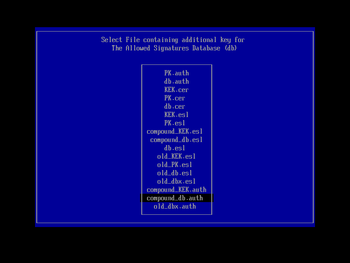
With the dbx variable loaded, you will be returned to the 'Select Key to Manipulate' screen again. Go through the same process for the db variable, only this time, choose the compound_db.auth file (that we prepared and copied to the boot USB key earlier) in the file selection dialog:
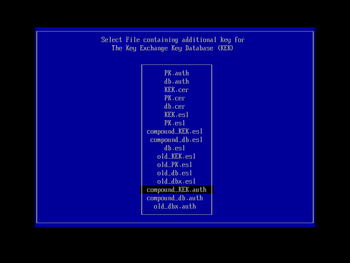
With the dbx and db loaded, next do the same for the KEK secure boot variable. Here, choose the compound_KEK.auth file (that we prepared and copied to the boot USB key earlier) in the file selection dialog:
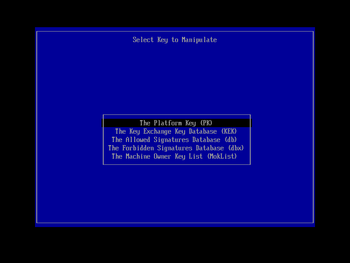
Lastly, we do the same thing for the PK secure boot variable, thereby tipping the system back into user mode (but with our platform key installed). Here, choose the PK.auth file (that we prepared and copied to the boot USB key2 earlier) in the file selection dialog:
With all four secure boot variables set up, press Esc to return from the 'Select Key to Manipulate' screen to KeyTool's main menu. It should show you that the 'Platform is in User Mode', if the previous steps were successful. Navigate to the the 'Exit' menu option, ensure the boot USB key is still inserted, and press Enter to quit KeyTool, thereby automatically triggering a reboot.
Now, as we only added a one-time ('BootNext') entry for the /EFI/Boot/KeyTool.efi executable, your target PC should restart back into Gentoo. Just as before, you will see the plymouth passphrase screen. Enter your LUKS keyfile gpg passphrase (the one you created earlier), directly at the target machine keyboard, and wait for the text console login to appear.
Then, re-connect to the machine via ssh. From the helper PC, issue:
user@pc2 $ssh root@192.168.1.106
Password: <enter root password>
... additional output suppressed ...
Substitute whatever IP address you got back from ifconfig earlier for
192.168.1.106 in the above command. It is possible (although unlikely, with modern DHCP) that the target's IP address will have changed during the reboot. If so, log in directly at the target machine's keyboard, use ifconfig to find out the new address, then issue the above ssh command citing that address. As before, in such a case you may need to clean out any previous record of ssh connections to (other machines at) that new address (since the fingerprints will not match), using:
user@pc2 $sed -i '/^[^[:digit:]]*192.168.1.106[^[:digit:]]/d' ~/.ssh/known_hosts
192.168.1.106 in the above. Then, be sure to check the fingerprint when prompted (by the subsequent ssh command), against those you noted down earlier.If installing over WiFi, and you had to manually restart wpa_supplicant in the previous chapter, then you'll need to do so again here (directly at the target machine's keyboard) before you'll be able to ssh in.
Now proceed as below, using the ssh connection to enter all commands unless otherwise specified (again, we will not need screen). Issue:
koneko ~ #cd /etc/efikeys
Display the contents of all the secure variables now. Issue:
koneko /etc/efikeys #efi-readvar
and verify that both your new keys, and Microsoft's original set, are present.
Now, let's make a backup (in machine readable signature list format) of the current (i.e., new) state of the variables. Issue:
koneko /etc/efikeys #efi-readvar -v PK -o new_PK.esl
koneko /etc/efikeys #efi-readvar -v KEK -o new_KEK.esl
koneko /etc/efikeys #efi-readvar -v db -o new_db.esl
koneko /etc/efikeys #efi-readvar -v dbx -o new_dbx.esl
Obviously, in the preceding, the actual BIOS GUI operations you will need to perform will most likely be somewhat different (depending on the make and version of your UEFI BIOS), but, if you were able to insert the four .auth files without error using KeyTool (and the above efi-readvar shows the values correctly initialized), then congratulations, your augmented keystore has now been set up, so continue reading at Testing Secure Boot with a Signed Kernel, immediately below.
However, if you did experience errors when running the preceding commands (and have already tried methods 1 and 2 also, without success) then unfortunately secure boot will not be usable (for non-Windows use) on your particular target PC. You'll need to ensure it is turned off when booting Gentoo.
Testing Secure Boot with a Signed Kernel
Our next step is to create an appropriately signed kernel. The buildkernel script will do this automatically for us, provided that the files /etc/efikeys/db.key (the private kernel-signing key) and /etc/efikeys/db.crt (its public key counterpart) exist (which they now do). Ensure that the boot USB key is still inserted, then issue:
koneko /etc/efikeys #buildkernel
This should not take long to complete (as by default it does not make clean).
You may see some output similar to the following from buildkernel:
... additional output suppressed ...
* Signing kernel
warning: file-aligned section .text extends beyond end of file
warning: checksum areas are greater than image size. Invalid section table?
... additional output suppressed ...
Assuming the kernel build completed successfully, we can now restart, turn on secure boot, and try it out! Ensure the boot USB key is still inserted, then issue:
koneko /etc/efikeys #systemctl reboot
Immediately your target PC starts to come back up again, enter the BIOS setup screen. As mentioned before, the exact method of entering the BIOS varies greatly from machine to machine (as does the BIOS user interface itself). On the Panasonic CF-AX3, press F2 during startup (you may need to press it repeatedly, and you do this directly on the target machine's keyboard).
Once the BIOS setup screen comes up, using the same navigation techniques as before, perform the following steps:
- turn on secure boot; and
- restart your machine (saving changes).
It's impossible to be precise about the GUI actions required to achieve the above, as they will vary from BIOS to BIOS. However, to give you some idea, here's how you go about it on the Panasonic CF-AX3 (which has an AMT BIOS).
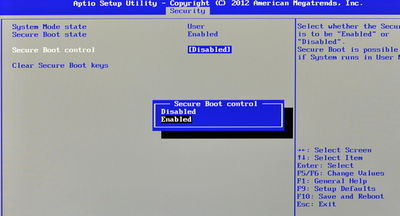
To achieve step 1 on the CF-AX3, use the arrow keys to select the 'Security' tab, then navigate down to the 'Secure Boot' item, and select it by pressing Enter. This enters a 'Security' page; navigate to the 'Secure Boot control' item, and press Enter. In the popup that appears, select 'Enabled' using the arrow keys, and press Enter:
Next, ensure that your USB boot key is still inserted, then press F10 to restart (step 2), and confirm if prompted.
The machine should restart, and, if all goes well (and your kernel is reasonably modern) you should see the console message EFI stub: UEFI Secure Boot is enabled. displayed briefly, followed shortly by the by now familiar plymouth passphrase screen. If so, then congratulations, you are running a self-signed kernel under secure boot! Enter your LUKS keyfile gpg passphrase (the one you created earlier), directly at the target machine keyboard, and wait for the text console login to appear.
If you have problems (for example, the target PC refuses to boot your signed kernel), then simply restart, turn off secure boot again via the BIOS (as described earlier), and then try working through the steps in this section again.
If that still doesn't work, then you may have more luck by using a UEFI shell to invoke special-purpose binaries from the efitools package.[9]
However, this is currently beyond the scope of this tutorial. If you cannot rectify the situation, you'll have to turn off secure boot when using Gentoo.Verifying Secure Boot with Windows (and Fixing RTC)
Having successfully booted our own self-signed kernel, we next have to check that Windows still works. Remove the boot USB key from the target machine, then (while it is still running Gentoo) log in directly at the target machine's keyboard (at the login prompt, enter 'root' as the user (without quotes), and then type the root password you set up earlier). Then issue (directly at the machine's keyboard):
koneko ~ #systemctl reboot
As the boot USB key is not inserted, Windows should start automatically. If it does boot, you have just verified that Windows also starts properly under your modified secure boot settings (and if it does not, follow the troubleshooting hints above).
Now, while Windows is running, let's take the chance to switch its clock to UTC, to match that used by systemd (which we set earlier in the tutorial).
To achieve this, login to your Windows account (which must have administrator rights - the first user created on a new Windows install has these by default), as usual. Next, perform the following steps (I have noted where things differ between Windows 10, 8.1 and 8):[10]
- First we'll check the Windows time, date and timezone is correct. Hit the Windows Key, which will bring up the start menu in Windows 10 (or the "start screen" in Windows 8.1 and 8), and type
date and time. Then click on the 'Date and Time' item which appears (in Windows 10 and 8.1; Windows 8 users will need to click the 'Settings' icon to see this result; note also that in Windows 8.1 and 8, as well as in more modern versions of Windows 10, the item you need to click is entitled 'Date and time settings' or 'Change the date and time'). A 'Date and time' dialog appears. Set appropriate values for your locale, and close the dialog when done. - Next, we'll instruct Windows to use UTC (this will require a registry edit). Hit the Windows Key, which will bring up the start menu in Windows 10 (or the "start screen" in Windows 8.1 and 8), and type
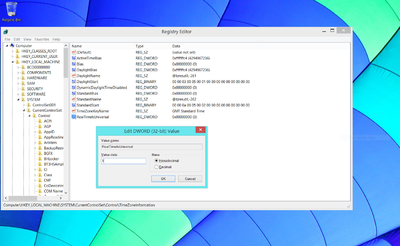
regedit. Then click on the 'regedit' item that appears. If prompted (via a dialog) whether to allow it to make changes to your computer, click 'Yes'. The regedit program now opens; using the navigation tree-view on the left, select HKEY_LOCAL_MACHINE\SYSTEM\CurrentControlSet\Control\TimeZoneInformation (you need to click on the little arrows to see the lower levels of the tree). Once this item has been selected, various time-zone related information will display on the right-hand pane. Right-click in the white area at the bottom of this pane, and choose New->DWORD (32-bit Value) from the context menu that appears. A fresh DWORD entry is added to the end of the list with its name selected — overtype this withRealTimeIsUniversalthen press Enter. Now double-click on the name, and a dialog will appear, in which you can edit the key's value. Type in1(the number one) for the value, as shown below: Close the dialog by clicking on 'OK'. Then exit the regedit application (using the menu item File->Exit). - Now we'll disable the Windows Time Service. This is most easily done from the Windows command line. Hit the Windows Key , which will bring up the start menu in Windows 10 (or the "start screen" in Windows 8.1 and 8), and type
command. Now right-click on the 'Command Prompt' icon that appears, then click on 'Run as administrator' item in the context menu (in Windows 10 and 8.1; it appears at the bottom of the screen in Windows 8). If asked whether you wish to proceed, click 'Yes'. You will be presented with an open command window. Now entersc config w32time start= disabledand press Enter. Hopefully, this should reportSUCCESS. Close out the command window (by clicking on the 'x' in its title bar). - Next, we'll force Windows to update the time. Hit the Windows Key, which will bring up the start menu in Windows 10 (or the "start screen" in Windows 8.1 and 8), and type
date and time. Then click on the 'Date and Time' item which appears (in Windows 10 and 8.1; Windows 8 users will need to click the 'Settings' icon to see this result; note also that in Windows 8.1 and 8, as well as in more modern versions of Windows 10, the item you need to click is entitled 'Date and time settings' or 'Change the date and time'). A 'Date and time' dialog (which we used above) appears again. Now, on older versions of Windows 10, select the 'Internet Time' tab, click on 'Change settings...' and click 'Update now', then press 'OK'. On Windows 8.1 and 8, as well as on more modern versions of Windows 10, instead move the 'Set time automatically' slider to 'Off', and then back to 'On' again. In either case, assuming you have a network connection, the time should immediately update when you do this (and, assuming your locale is set correctly, it should be accurate). Close out the dialog once complete.
Setting BIOS Password (Optional), and Restarting Gentoo Linux
Next, we will reboot back into Gentoo. Re-insert the boot USB key into the target PC. Then, in Windows-8, hit CtrlAltDelete, then click on the power icon at the bottom right of the screen, and choose 'Restart' from the pop-up menu.
Immediately your target PC starts to come back up again, enter the BIOS setup screen. As mentioned a number of times now, the exact method of entering the BIOS varies greatly from machine to machine (as does the BIOS user interface itself). On the Panasonic CF-AX3, press F2 during startup (you may need to press it repeatedly, and you do this directly on the target machine's keyboard).
If your target machine is using the 'fast boot' option with Windows, you may not have sufficient time to hit the BIOS-enter key on restart. See this earlier note for a solution.
Once you have the BIOS configuration screen up, you need to perform the following steps:
- select the "Gentoo Linux (USB Key)" EFI boot item as top priority;
- (optionally) set a BIOS password; then
- restart your machine (saving changes).
It's impossible to be precise about the GUI actions required to achieve the above, as they will vary from BIOS to BIOS. However, to give you some idea, here's how you go about it on the Panasonic CF-AX3 (which has an AMT BIOS).
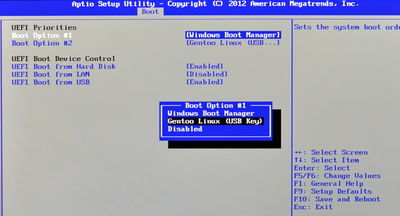
To achieve step 1 on the CF-AX3, use the arrow keys the arrow keys to navigate to the 'Boot' tab, and then down to the 'UEFI Priorities' item. Press Enter, and a sub-page is displayed. Ensure the item 'UEFI Boot from USB' is enabled (if it isn't, enable it now, and then press F10 to restart, and come back to this point). Navigate down to 'Boot Option #1' and press Enter. In the pop-up menu that appears, select the "Gentoo Linux (USB Key)" item (which was added to the boot list when we ran buildkernel earlier):
Press Enter to set this as the top boot option. Finally, press Esc to exit the subpage.
Some PC UEFI BIOSes may not accept / display a USB boot target unless you:
- insert the USB device when the BIOS screen is active;
- then power cycle (e.g., via F10 on the Panasonic CF-AX3); and then
- come back immediately into the BIOS (via F2 on the CF-AX3).
Each time you use Windows, you'll need to go through this BIOS process prior to using your USB key to boot into Linux again, because Windows will generally place itself at the top of the list when it runs.[11] It's a little annoying, but we have avoided the need for a shim bootloader! (Furthermore, you only have to go through this process when switching from Windows to Linux, and not when power cycling Linux, or switching from Linux to Windows (since you simply restart without the USB boot key inserted to do that).)
There is some evidence that more modern versions of Windows 10 do not auto-rewrite the EFI boot list. If this is true on your target PC, then the dual-boot process is greatly simplified - just start up your machine with the boot USB key inserted, to run Gentoo, or with it absent, to run Windows.
There is an alternative procedure, but it comes with some complications. When you are running Windows (and want to restart into Linux), hit CtrlAltDelete, then click on the power icon at the bottom right of the screen, and then while holding down Shift, click 'Restart' from the pop-up menu. This will pass you into the Windows boot options menu. Once this comes up (and asks you to 'Choose an option'), click on the 'Use a device' tile. This will show another page, on which you will see a tile entitled 'Gentoo Linux (USB Key)' (and possibly some others). Insert the boot USB key, click the tile, and you should find that the system restarts and that Linux is loaded (and you get the usual plymouth passphrase screen, etc.).
So far, so good, since this way of working avoids going through the BIOS. However, when you do this, Windows has only really set the (one-time) 'BootNext' value in EFI, which means that once you restart again from Gentoo (even with the boot USB key still inserted), Windows will start up. To get around this, once you have booted into Gentoo and logged in as root, you need to use the efibootmgr tool (which you already have installed on your system at this point, as it is a dependency of buildkernel), to show (and then re-order) the boot list. As root, issue:
koneko ~ #efibootmgr
BootCurrent: 0000
Timeout: 1 seconds
BootOrder: 0003,0004,0005,0000
Boot0000* Gentoo Linux (USB Key)
Boot0003* Windows Boot Manager
Boot0004* UEFI: IP4 Intel(R) Ethernet Connection I218-LM
Boot0005* UEFI: IP6 Intel(R) Ethernet Connection I218-LM
Clearly, the above is only an example, and your output would probably differ; but the important point to note is that while you are booted into item X on the list (as shown by BootCurrent, here 0000), the underlying BootOrder has entry Y first on the list (which is Windows, here 0003).
You could then fix this by issuing (for our example here):
koneko ~ #efibootmgr --bootorder 0000,0003,0004,0005
BootCurrent: 0000
Timeout: 1 seconds
BootOrder: 0000,0003,0004,0005
Boot0000* Gentoo Linux (USB Key)
Boot0003* Windows Boot Manager
Boot0004* UEFI: IP4 Intel(R) Ethernet Connection I218-LM
Boot0005* UEFI: IP6 Intel(R) Ethernet Connection I218-LM
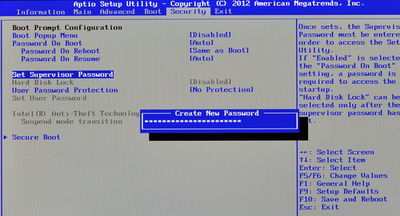
The next step (#2, installing a BIOS password) is optional, but it is sensible to ensure that secure boot cannot be switched off by an attacker with temporary access to your machine (to permit a tampered kernel to run without your knowledge, for example). Most machines support some form of BIOS password, but the means of setting it varies widely. On the CF-AX3, use the arrow keys to navigate to the 'Security' tab, and then move down to the 'Set Supervisor Password' item, and press Enter. Type your password into the pop-up that appears:
When done, press Enter. Then, when prompted, re-type the password to confirm and press Enter.
Write this password down in a safe place! If you forget it, you won't be able to access your BIOS, and you'll have to contact your machine's manufacturer to have it reset.
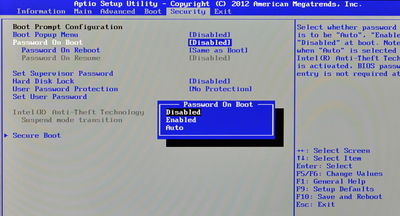
It is then sensible (on the CF-AX3, at any rate) to disable the BIOS's boot password prompt (otherwise, you'll have to type in the BIOS (supervisor) password every time you boot from USB). On the CF-AX3, navigate up to the 'Password On Boot' item, and press Enter. Then, in the pop-up that appears, use the arrow keys to select 'Disabled', and press Enter to select:
That's it! Now ensure that the boot USB key is still inserted, then press F10 to restart (step 3), and confirm if prompted.
The machine should restart, and, if all goes well, you should shortly be prompted with the familiar plymouth passphrase screen. Enter your LUKS keyfile gpg passphrase (the one you created earlier), directly at the target machine keyboard, and wait for the text console login to appear, just as before.
Then, re-connect to the machine via ssh. From the helper PC, issue:
user@pc2 $ssh root@192.168.1.106
Password: <enter root password>
... additional output suppressed ...
Substitute whatever IP address you got back from ifconfig earlier for
192.168.1.106 in the above command. It is possible (although unlikely, with modern DHCP) that the target's IP address will have changed during the reboot. If so, log in directly at the target machine's keyboard, use ifconfig to find out the new address, then issue the above ssh command citing that address. As before, in such a case you may need to clean out any previous record of ssh connections to (other machines at) that new address (since the fingerprints will not match), using:
user@pc2 $sed -i '/^[^[:digit:]]*192.168.1.106[^[:digit:]]/d' ~/.ssh/known_hosts
192.168.1.106 in the above. Then, be sure to check the fingerprint when prompted (by the subsequent ssh command), against those you noted down earlier.If installing over WiFi, and you had to manually restart wpa_supplicant in the previous chapter, then you'll need to do so again here (directly at the target machine's keyboard) before you'll be able to ssh in.
Use the ssh connection to enter all subsequent commands unless otherwise specified (do not start up screen at this point, we'll do so again shortly).
The final thing thing we must do here is to check that our system time details have not been messed up by Windows (which, given the changes we have just made, they should not have been). Issue:
koneko ~ #timedatectl
and make sure the time and date are still correct, and in particular that the RTC in local TZ field reports as no.
If the local time is not correct, issue:
koneko ~ #timedatectl set-time "YYYY-MM-DD hh:mm:ss"
to set it.
Obviously, substitute for
YYYY-MM-DD hh:mm:ss with the actual, numerical date and time. For example, to set the date/time to 5:20pm on August 29th 2017 (local time), you would issue:
koneko ~ #timedatectl set-time "2017-08-29 17:20:00"
Next Steps
Congratulations, setup of secure boot is complete! Next, we can install the GNOME 3 graphical environment. Click here to go to the next chapter, "Setting up the GNOME 3 Desktop".
Notes
- ↑ Bottomley, J. "The Meaning of all the UEFI Keys"
- ↑ Kroah-Hartman, G. "Booting a Self-signed Linux Kernel"
- ↑ Smith, Rod. "Managing EFI Boot Loaders for Linux: Dealing with Secure Boot"
- ↑ Unified Extensible Firmware Specification, Version 2.4, April 2014. Download available after registration from UEFI
- ↑ Stevens, Didier. Blog: "Howto: Make Your Own Cert With OpenSSL"
- ↑ Developers Club: "We subdue UEFI SecureBoot"; see section "We convert public keys into the ESL format"
- ↑ James Bottomley's random Pages: "UEFI Secure Boot: Comment 73940"
- ↑ SUSE Conversations: "SUSE and Secure Boot: The Details"
- ↑ Smith, Rod. "Managing EFI Boot Loaders for Linux: Controlling Secure Boot"
- ↑ SuperUser Forum: "Force Windows 8 to use UTC when dealing with BIOS clock"
- ↑ Watson, J. ZDNet: "UEFI and Windows 8 Update on Windows/Linux dual-boot systems"
| < Previous | Home | Next > |

